추적: • figlet • jedit • web_browser • bintray • embeddeddatasource • find • spring_data_redis • vmwareplayer • junitperf • virtualbox
사이드바
virtualbox
목차
VirtualBox
가상머신 목록
VBoxManage list vms # 전체 목록
VBoxManage list runningvms # 실행중인 것만
백그라운드로 VM 띄우기
- Run Virtualbox in background without a window
VBoxManage startvm "{VMName}" --type headless # 혹은 VBoxHeadless -startvm "{VMName}" - Windows Host에서 창 없이 VirtualBox 가상머신 띄우기
powershell start-process 'C:\program files\oracle\virtualbox\vboxheadless' '-s 가상머신이름' -WindowStyle Hidden
VM 종료
VBoxManage controlvm <uuid|vmname> pause|resume|reset|poweroff|savestate|acpipowerbutton|acpisleepbutton
가상머신 용량 늘리기
VBoxManage modifyhd
Disk 설정
- 동적 사이즈(Dynamically Allocated)보다 고정 사이즈(Fixed Size)가 성능이 더 좋긴하다. 그러나 용량측면에서는 동적 사이즈가 좋음.
- 디스크 컨트롤러 설정 : Use Host I/O Cache를 사용하면 디스크 성능이 향상된다.
- How to Shrink a VirtualBox Virtual Machine and Free Up Disk Space : 동적 사이즈일 때 디스크를 현재 데이터 사이즈에 딱 맞게 최소한으로 줄이기
화면 사이즈 추가(Screen resolution)
# 가상머신 실행 전 설정
VBoxManage setextradata [VM Name] CustomVideoMode[num] [width]x[height]x[color depth]

# 가상머신 실행 후 변경
VBoxManage controlvm [VM Name] setvideomodehint [width] [height] [color depth]
Full Screen
- 듀얼 머니터에서 풀스크린 위치 변경하기 - Is there a way to make virtualbox use a specific monitor when going full screen
- Full Screen 상태로 만듬
Host + Home→View(보기)→Virtual Screen 1(가상화면 1)에서 모니터 선택.
Windows host
VBoxManage.exe: error: VT-x is not available (VERR_VMX_NO_VMX)- Hyper-V 서비스를 끌 것. Hyper-V와 VirtualBox 동시에 작동 안되는 듯.
제어판 → 프로그램 및 기능 → Windows 기능 켜기/끄기- 혹은 BIOS 에서 VT-x 꺼뒀는지 확인.
Disk 용량 증가시키기
- 동적할당 디스크의 디스크 공간을 추후에 증가시키는 것이 가능하다.
- Snapshot 이 있다면 삭제하는게 낫다.
- VirtualBox 파일 → 가상 미디어 관리자에서 디스크를 선택하여 용량을 증가시킨후(명령행으로도 가능)
- 그 뒤
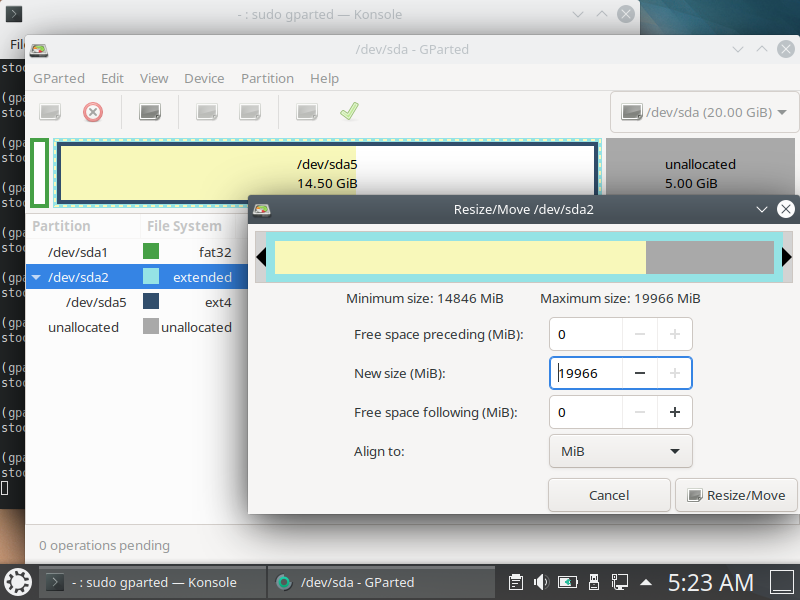
gparted가 있는 운영체제 ISO 로 가상머신을 부팅시켜서gparted로 해당 파티션 크기를 증가시켜야 한다.- 이를 위해 설정 → 시스템 → 마더보드 → 부팅순서에서 광디스크를 상위로 올려야 한다.
- 없으면 /GParted Download 에서 ISO 다운로드.
gparted로 조정시,extended파티션 안에 있는 파티션은, 먼저extended를 조정해준뒤에 그 안의 파티션 사이즈를 조정한다.
# 명령행 Disk resize 방식

VBoxManage modifymedium disk “C:\Users\Chris\VirtualBox VMs\Windows 7\Windows 7.vdi” --resize 81920
# VBoxManage modifyhd “C:\Users\Chris\VirtualBox VMs\Windows 7\Windows 7.vdi” --resize 81920 : 구버전 VBox

# 이 후 가상머신을 실행하고 디스크 파티션 관리자에서 파티션 크기 조정
Host 운영체제의 Audio가 안나오고 Youtube가 멈췄다면
- Host 운영체제의 Audio가 안나오고 Youtube가 멈추는 등의 현상이 발생한다면, Guest 시스템의 Audio 를 꺼버리면 잘 작동했다. 버그인지 잘 모르겠음. (2020년 09월)
virtualbox.txt · 마지막으로 수정됨: 2022/01/09 01:14 저자 kwon37xi
별도로 명시하지 않을 경우, 이 위키의 내용은 다음 라이선스에 따라 사용할 수 있습니다: CC Attribution-Share Alike 4.0 International


